|
Gladinet, inc |
|
CentreStack |
|
Deployment Guide |
|
|
|
Gladinet, Inc. |
|
5/29/2015 |
|
This document discusses the technologies behind CentreStack - Build 6.5.2033.32552 |
Table of Contents
Windows 2008 (SP2/R2), Windows 2012/R2
Recommended Hardware Specification
Access Clients and CENTRESTACK
CentreStack and Active Directory
Three-Server Deployment for Redundancy
Multiple-Machine Deployment for Scalability
Typical Deployment in Enterprise
Prepare Clean Windows 2008/R2 or 2012/R2 Machine
Configure the Very First Tenant
Select Active Directory (optional)
Pick a default (Primary) storage
Active Directory Integration (Optional)
Change Authentication Algorithm to Version 2
Change the Synchronized Uploader to Asynchronized Uploader
Tuning #1 – namespace/web.config
Tuning #4 – appConcurrentRequestLimit
Overview of CentreStack
CentreStack provides value-added services on top of cloud storage services or local storage services. Cloud Storage services include those from OpenStack Swift, Amazon S3 and its compatibles, Google Cloud Storage, HP Cloud Storage and many others. Local Storage Services include file server Storage, SAN or NAS storage. CentreStack value-added services can be summarized as Backup, Access, Sync and Share, Identity, Control and Collaboration (BASIC), which is also known as EFSS (Enterprise File Sync and Share) solution.
CentreStack is a cluster of web services built on top of the Microsoft Web Platform. It provides the BASIC value-added services that facilitate online storage access for PCs, Macs, File Servers, Web Browsers, and Mobile Devices.
The services can be deployed in flexible combinations to meet different needs. For example, you can deploy it on premise as a private cloud; or you can deploy it off-premise in a data center, managed by your managed service provider (MSP); or you can deploy it in Amazon EC2-like environment as virtual-private deployment.
There are three different types of machines (or Virtual Machines). In the smallest deployment unit, the three different logical nodes can co-exist in one single machine (all-in-one deployment).
Web Front Node:
The Account Management, Sign-in and Load-balancing services will be installed on this physical machine (or virtual machine). Depending on the load, you may need 1 to N such nodes. Normally, we recommend for every web front node, you can have 10+ worker nodes. When you have small deployments, you can skip web front nodes and combine them into worker nodes. All the installation work is the same. If you do not need web front node, you do not need to assign them in the cluster manager.
Example: ACME Corporation deploys two web front nodes node1.acme.com and node2.acme.com. Each node is running a copy of CentreStack, connecting to the same SQL database.
ACME Corporation acquires a domain name (DNS) of cloud.acme.com which is load balanced to node1.acme.com and node2.acme.com.
When Users point their browsers to https://cloud.acme.com, it is directed to one of the node for login page.
NOTE 1: If you have hardware load balancing available, you do not need to use web nodes at all.
NOTE 2: Windows 2012/R2 comes with Network Load Balancing (NLB). If you use NLB, you do not need web nodes at all.
NOTE 3: Basically if you have any existing Load Balancer, you can skip web nodes.
Worker Node:
This type of node will contain services like Web Browser Based File Manager, Storage Service Connectors, and etc. Again, additional nodes can be added as the load increases. Because there is cache information located on each node, users will have an affinity to a single node once it is assigned. If the load balancer distributes users evenly to all worker nodes, the cache information may exist on all worker nodes. Since Worker Node and Web Node runs exactly the same binary code, most of the time, Worker Node can take on Web Node functionalities and the Web Node can be skipped.
Database Node:
The database contains persistent information for the system. In general, once a user is logged in, database access is no-longer needed for normal operations. If the database is down, most end user operations can continue with cached information (However, user need to access the database at least once to login and cache information). Database is a critical component for the smooth operation of the CentreStack server farm. Local database with latency less than 10 millisecond is recommended.
NOTE: If you have hardware load balancer or other kind of load balancer, you do not need web nodes from the above picture.
Terminology
CentreStack Cluster – Multiple CentreStack single-machine nodes connected together by pointing to the same database and share the same configuration information from the database. The whole CentreStack cluster operates as if it was a single entity.
Master Admin/Cluster Admin - In this guide, we refer to the admin user as the user that manages the whole CentreStack Cluster package. The Master Admin is the very first user that registers with the CentreStack. Typically, it is the user who installs the CentreStack. Since this user later may set up Active Directory connections, it is recommended this user not an Active Directory user to avoid circular dependency.
Tenant Admin - These are the users who actually use the product but are the admins for their teams (tenant or company). This is the very first tenant account user. Usually, the Tenant User is created by Master Admin. The Master Admin is also the Tenant Admin for his own team/company. Tenant admin can later delegate administrative tasks to team users.
Team User – The team user is a user under a specific Tenant. Team users are created by the Tenant Admin.
Access Clients – CentreStack contains various access clients which includes Web Browser Based File Manager, Windows Desktop Client, Windows Server Client, Mac OS X client and Mobile Applications. Through the access clients, end users see the BASIC value-add services on top of raw storage services. The discussion of the access clients are outside the scope of this deployment guide.
Dependency Components
CentreStack is built on top of Microsoft Web Platform including Internet Information Server 7/8 (IIS), .Net Framework 4.5, ASP.NET and SQL Server or SQL Server Express. The base operating system can be either Windows 2008 with Service Pack 2 or R2, or Windows 2012, and Windows 2012 R2.
We recommend Windows Server 2012 or Windows Server 2012 R2 since .Net Framework 4.5 comes directly with these newer server OS platforms. It is easier and faster to install CentreStack on Windows Server 2012 or 2012 R2.
Windows 2008 (SP2/R2), Windows 2012/R2
The base operating system provides the base of the Microsoft Web Platform. It will be loaded with the mentioned Microsoft components before the CentreStack is installed.
NOTE: Base Operating System with English locale is recommended. (The User Interface can be in other locale.)
SQL Server
SQL Server or SQL Server Express is used to store static configuration information such as user name, email, storage configuration, files and folders sharing information and others. It is recommended the SQL Server has daily backups since it holds configuration information for the service to run properly.
If you have SQL Server Standard Edition or SQL Server Enterprise Edition, you may have high availability features available such as Always-On Clustering and Always-On Fail Over Group.
.Net Framework 4
CentreStack Server is built with .Net Framework 4.
We recommend .Net Framework 4.5 as it works better with remote clients that have Internet Explorer 10 or 11.
NOTE: Most of the Access Clients are built with native code on each platform for example, Windows Client built with Visual C++, Mac Client built with Object-C etc.
ASP.NET 4.5
CentreStack web browser user interface is written in ASP.NET, HTML and JavaScript.
Internet Information Server
CentreStack services are hosted inside Internet Information Server (IIS). It provides brokerage functionalities between the Access Clients and the backend storage. It is also a value-add layer on top of the backend storage.
Recommended Hardware Specification
Memory: 8GB, (16GB is better if available)
Hard Drive: 200G
Operating System: Windows 2008 R2, Windows 2012 or R2
CPU: Intel, minimum 4-Core, prefer 8-Core (or 4-vCPU/8-vCPU if on virtual machine)
NOTE: Virtual Machines are recommended. Clean machine built from base OS with English Locale is recommended.
Capacity Planning
For user count smaller than 1000, a single CentreStack server is enough. In this case you will install the CentreStack Server in a single physical or virtual machine. The default CentreStack installer will install all the components (Database Node/WebFront Node/Worker Node) in one machine.
For user count greater than 1000, it is recommended to have the SQL Server node in a separate physical or virtual machine. The rest of the worker nodes will share the load for the users in a capacity of 1000 each. In this case a virtual machine is recommended for each worker node and you should use a wild card SSL certificate for each worker node. NOTE: In some big deployments, the SSL can be off-loaded to hardware load balancer such as a Citrix NetScaler or F5 BIG IP.
The capacity of 1000 is referring to concurrent users. It is possible that you may have 5000 named users but only 1000 of them are using the product concurrently. So, in this case the per-server capacity can be 5000 named users. (Concurrent-User is defined as the users making requests in a 10-second period. For example, if you make a request A, and I make a request B, if the time-difference between request A and request B is less than 10 seconds, request A and request B are concurrent).
EXAMPLE: If you have 300,000 users in your company, you may need between 30-60 worker nodes (5000 – 10,000 named users for each worker node)
Load Balancing
Our recommendation is for you to use your own load balancing device if possible. However, CentreStack is capable of using Web Front nodes for load-balancing if you do not have an existing load balancer.
Web Front node runs the same CentreStack software. If you have more than one Web Front node, you will need another load balancer to load balance to web nodes anyway. So, if you ever need to have more than one web front node, you may as well have your own load balancer and omit web front nodes.
For example, from the worker node1, node2,… node N, you can pick a subset of nodes such as node1 and node2. You will acquire a domain name such as cloud.acme.com and will round robin cloud.acme.com to either node1.acme.com or node2.acme.com. This way, when an end user points the web browser to https://cloud.acme.com, it will be load balanced to one of the worker node in the selected subset for login purposes. After login the CentreStack load balancing will take over and do the rest of the load balancing.
If you have hardware load balancer such as F5, you can skip web nodes, and have F5 directly load balance to a farm of worker nodes.
You can also use Network Load Balancing feature which is included in Windows 2012/R2 for load balancing.
Tenant Considerations
CentreStack comes with two different package options, one is for a single business, and the other is for service providers. The two packages may be contained in one single download binary and the option can be selected during installation time.
Single Business Package – Single Active Directory Integration, Single Tenant
Service Provider Package – Multiple Active Directory Integrations, Multiple Tenants
Both packages support non-Active Directory users in addition to Active Directory users.
Active Directory Integration
There are two user management modes in CentreStack.
In the first mode, the default user manager mode, users are manually created, and active directory users are imported. In this mode, it is possible to have both non-Active Directory users and Active Directory users. Non-Active Directory users are referred to as Native Users.
In the second mode, the active directory mode, there is no need to create or import users and you can use native Active Directory groups. You can also have non-Active Directory users by creating them manually.
When Active Directory integration is turned on, the CentreStack for Single Business is allowed to use SAMAccount name (Windows NT4 user name) to login.
The Service Provider package allows you to connect to multiple active directories services but you will need to import users from active directory and use UPN/Email address to login.
Storage Considerations
In the CentreStack system, for each tenant, there is one mandatory primary storage and there can be multiple, optional auxiliary storage services. The primary storage is the tenant’s default root storage folder.
If you setup the CentreStack in Amazon EC2 environment, the primary storage usually is an Amazon S3 bucket.
If you setup the CentreStack on premise, the primary storage can be your file server storage and the auxiliary storage can be other cloud storage services. OpenStack Swift is also a popular storage service in private enterprises.
CentreStack can be setup in a Rackspace data center on Cloud Server, Windows Azure VM, IBM SoftLayer Data Center and connect to Cloud Files, Azure Blob Storage, and SoftLayer Object Storage (OpenStack Swift based) respectively.
Once a tenant’s default storage is set, it cannot be changed to other types of storage later (you could still update information related to the same storage service, for example, update Amazon S3 secret key). However, the auxiliary storage can be modified later.
Backup CentreStack
Only the SQL Server database contains persistent configuration information. All other components are stateless and replaceable. In a disaster recovery scenario, as soon as the SQL Server is restored, other worker nodes can be re-installed and will start working immediately. You can also point the worker node’s database reference to the new SQL Server; it will work immediately with the information from the database.
The worker nodes are stateless so it is not required to backup any worker nodes. They can be provisioned by a clean OS with a copy of CentreStack. As soon as they are connected to the same database they become a node in the cluster.
NOTE: You will also need to back up your storage services. Most of the time, if you are using Cloud Storage services such as Amazon S3 or OpenStack Swift, the service has built-in redundancy.
Deployment Scenarios
Private On-premise
You can prepare a Windows 2008 Service Pack 2 or R2 server or Windows 2012/R2 server and install CentreStack. In this scenario, Active Directory is typically at the same site and primary storage is from file server or NAS storage.
Private Off-Premise
Normally a managed service provider (MSP) manages your IT services, such as hosted exchange servers, hosted file servers etc. You can ask the same managed service provider to install and manage the CentreStack for you in their data center.
Virtual Private Cloud
In this deployment scenario, you would deploy the CentreStack solution in a virtual private cloud environment such as Amazon EC2. CentreStack is also available in the form of AMI image to facilitate creation of EC2 instances. In this deployment scenario, the typical primary storage connection is to the Amazon S3 storage. You can also set it up in an environment such as HP Helion (OpenStack) Cloud, with a Windows 2012 Server connecting to OpenStack Swift storage.
Multi-Site Deployment
Please reference the Multi-Site Deployment Guide for multi-site deployment.
Security Consideration
Access Clients and CENTRESTACK
The access clients will be configured with an access end point in the form of https://cloud.acme.com, where cloud.acme.com is the DNS name of your CentreStack server. The communication from the access clients, such as login request will be protected by SSL over HTTP (HTTPS).
CentreStack and Active Directory
If the CentreStack is configured with Active Directory, CentreStack will authenticate users on behalf of the active directory by contacting the Active Directory over LDAP or LDAPS. There is no direct communication between the access clients and the Active Directory.
Different Deployment Options
As documented above, the CentreStack has three logical nodes, the database node, the web front node and the worker node. This section will go through different deployment options.
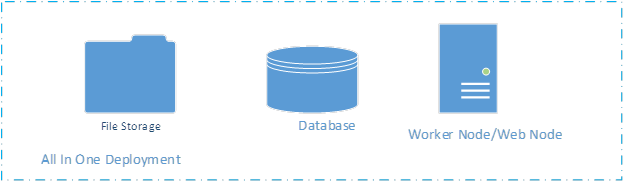
All-In-One Deployment
This is the simplest deployment. The database node, the web front node and the worker node are all on the same machine. When you are serving < 1000 users or you are doing Proof-of-Concept (POC), this is the ideal deployment because of its simplicity. You can install the SQL Express on the same machine, then install CentreStack and point the database to localhost\SQLEXPRESS. In the All-In-One deployment, the storage location is typically set to a folder on local C: drive or local D: drive. The installer can also install SQL EXPRESS so it is a one-click installation for convenience.
NOTE: If this is the first time you are installing CentreStack, this is the recommended setup because it is the easiest to setup and only takes 15-20 minutes.
In the latest CentreStack installer, the installer is capable of doing the all-in-one installation without asking you to setup SQL Express separately.
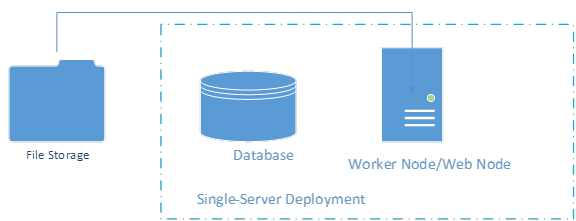
Single-Server Deployment
This is another simple deployment. It is very similar to the All-In-One deployment. The only difference is that the file storage is off the machine instead of on the machine.
The external file storage can be file storage on a UNC path or it can also be a private object storage service.
In this deployment, the SQL Server Express and the Worker Node/Web Node are still deployed on the same machine.
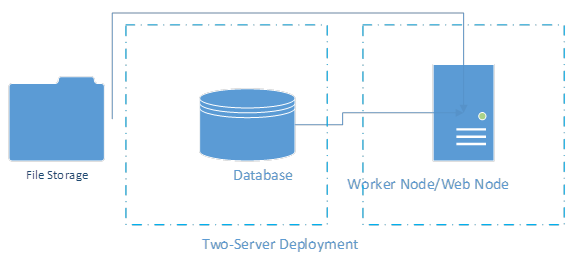
Two-Server Deployment
In the two server deployment, the SQL Server database is installed in its own server; away from the CentreStack worker node. Usually, this is an intermediate step leading to the “Three-Server Deployment” and a step towards scaling up the server farm.
Three-Server Deployment for Redundancy
The 3-machine deployment is another simple deployment. The database node is installed separately. Two CentreStack worker nodes are installed. The “External URL” field for each node is the same, such as “cloud.acme.com”. The load balancer will do a round robin load balancing to either node. A variation of the deployment is to set “External URL” field differently for the two worker nodes. When “External URL” field is the same as the load balancer URL, everything is round robin. When “External URL” is different, such as node1.acme.com and node2.acme.com, the users will have affinity to one of the node. For example, if user1 is assigned to node1.acme.com, he will continue to use node1.acme.com. In this deployment, the size of the cluster is still supporting 1000 concurrent-users per node. The benefit is that if one node is down, there is another node for redundancy.

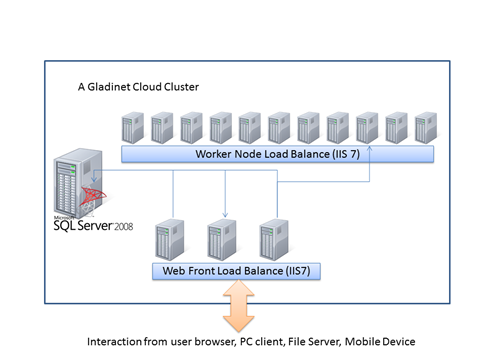
Multiple-Machine Deployment for Scalability
In this deployment, you will have clear separation of database node, the web front node and the worker node. The database node is not a CentreStack worker node; it is just a server that runs SQL Server. The web front node and the worker node are all CentreStack nodes which run the same software but functionally work different.

The web front nodes are used for user login. After login, the user will be re-directed to the corresponding worker node. (The web front node can be omitted if you have an existing Load Balancer).
For the load balancing to work, all the worker nodes and web front nodes have to be on the same domain and same level of sub domain (for example, they can be covered by same SSL wildcard certificate, such a *.acme.com). The load balancing requires at least two worker nodes.
· Install the Enterprise/Service Provider package on the first worker node. Reboot and setup the cluster admin account.
· Install the Enterprise/Service Provider package on all the other work nodes. On the database configuration window, use the same database server as the first installation.
Note: We recommend you setup and configure the first node and make sure it runs smoothly first, before you setup and install the second node.
· From any worker node, login to CentreStack Cluster Manager with the cluster admin account (the account you setup during the installation of the first worker node)
· Go to Cluster Server Farm tab, click on ‘Edit’ and define all worker nodes.
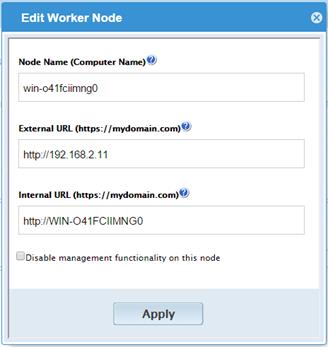
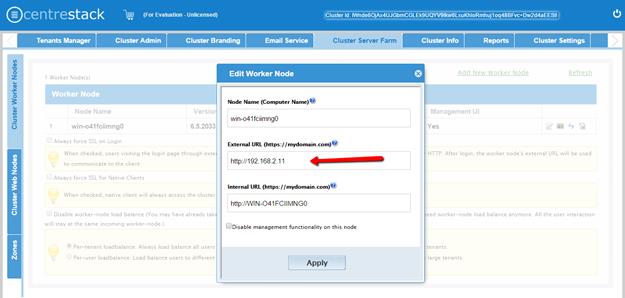
o For each worker node, the node name has to be the machine’s NETBIOS name (hostname).
o The external URL is the unique URL to access the node from public internet. For example, http://node1.acme.com, http://node2.acme.com
o The internal URL is the internal DNS name/URL from the internet network.
· (Web Nodes are optional, if you need to install Web Nodes) Install the Enterprise/Service Provider package on all the web front nodes. Use the same database as the worker nodes. Please DO NOT add web front nodes to the Cluster Worker Node list. Most of the time when you have a multi-worker-node design, you are servicing many users, and most of the time; you have your own load balancer. In the case when you have your own load balancer, the web node functionality can be merged into worker node. So you can have a zero-web-node configuration.
· Setup DNS Load balancing for all worker nodes.
Now, users should be able to login from the web front node and get automatically redirected to the worker nodes. In this setup, you will have one database. Most of the time you will need just two web front nodes since the web front nodes are used just for user logins and direct the users to one of the worker nodes, the load can scale at 10,000 concurrent users per web-node. The rest of the worker nodes can scale at 1000-concurrent-user each. If you are using hardware load balancer, you can skip web-nodes and have an all-worker-node cluster.
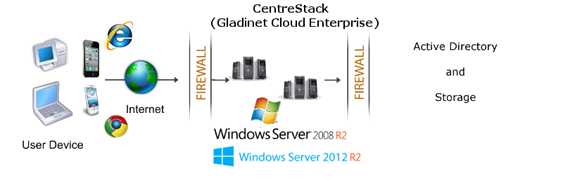
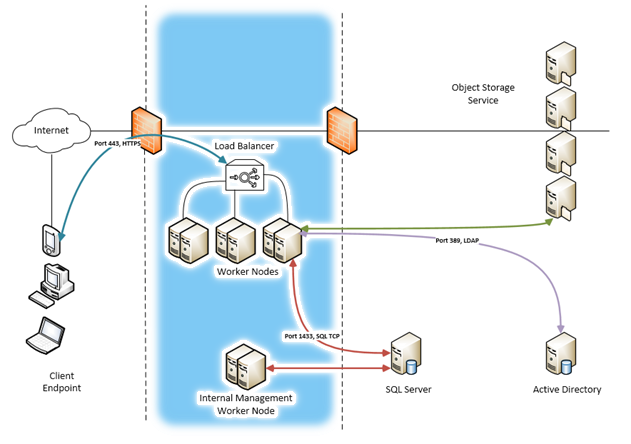
Typical Deployment in Enterprise
Here is a typical deployment schema in Visio Diagram for very big deployment in enterprise. In this deployment, the management functionality can be separated to internal management node (A property of worker node).
Deployment Steps
Prepare Clean Windows 2008/R2 or 2012/R2 Machine
It is recommended you start with clean machine with just the base operating system only. Our recommendation now is to use Windows Server 2012/R2 as the base OS with English locale. (The server side English Locale will not affect the client side of the locale choice.)
If you are using Windows Server 2012 or Windows Server 2012 R2, you will get .NET Framework 4.5 and ASP.NET 4.5 instead of .NET Framework 4 and ASP.NET 4 on Windows 2008 SP2/R2). We recommend .NET Framework 4.5.
When you are using the latest all-in-one web installer, the installer will pull in necessary components and install them one-by-one automatically. On Windows 2012/R2, many components already exist on the system so it is easier and faster to install. Typical installation time is 15-20 minutes.
On Windows 2008 R2, the installer will install .NET 4.5 so the installation time on Windows 2008 R2 servers will be a little bit longer than the one on Windows 2012 R2 server.
Start Installation
CentreStack is a standard Microsoft Windows Executable. To start, you will need to obtain the installer package from www.gladinet.com and start the installation.
Step 1:
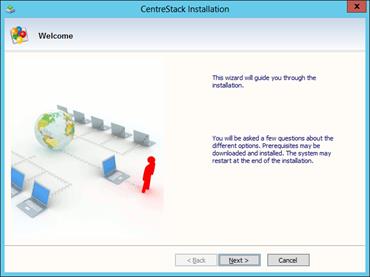
Click ‘Next’ on the Welcome screen.
Step 2:
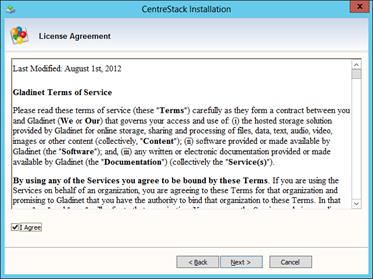
Accept the License Agreement and click on ‘Next’
Step 3:
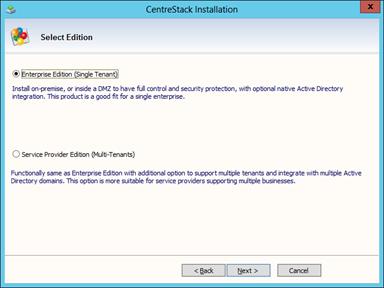
If you are an Enterprise looking for a single Enterprise deployment, select ‘Enterprise Edition (Single Tenant) option. However, if you are a service provider, select ‘Service Provider Edition (Multi-Tenants).
Step 4:
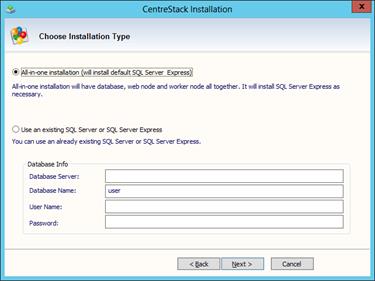
One of the steps during installation is the database configuration.
If the CentreStack is servicing a small number of users < 1000, you can use SQL Server Express on the same CentreStack machine so you can accept the default localhost\SQLEXPRESS.
NOTE: If you decide to use a SQL Server/Express from a different machine, the CentreStack will not install the SQL Server or Express. You will install the SQL Server or SQL Server Express on the other machine and need to make sure it is ready.
If you plan to use CentreStack for a bigger user group, we recommend you keep the database on a separate machine with daily backups.
Database Consideration:
Supported Microsoft SQL Server versions are:
· SQL Server 2008 and 2008 R2 with all service packs, Express, Standard, Enterprise, and Datacenter Editions
· SQL Server 2012 with all service packs, Express, Standard, and Enterprise Editions.
· SQL Server 2014
The following database features are supported (except SQL Server Express, which supports only standalone mode):
· SQL Server Clustered Instances
· SQL Mirroring
· SQL Server 2012 AlwaysOn Availability Groups
The minimum set of database rights required are
· The ability to create database and be the owner of that database, hence ‘dbcreator’ and ‘dbowner’
· The ability to write into master, model, msdb, tempdb during install. If you pre-create the database and assigned the dbowner already. These privileges may not be necessary.
Step 5:
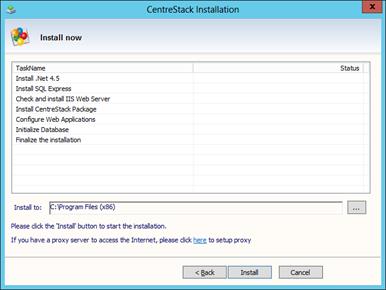
Let the installation continues.
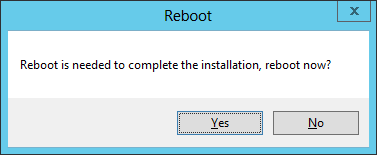
Step 6:
After the CentreStack installation, a reboot is required.
Initial Configuration
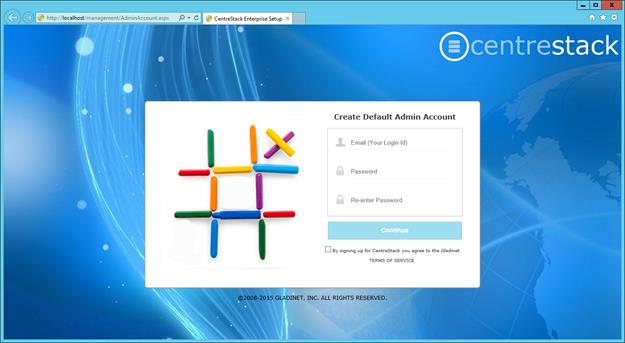
After machine reboots, you will log back into the machine’s Windows Console using same admin user which was used to install the CentreStack. A web browser page will be displayed automatically prompting you to create the default admin account.
Note: If the page does not come up automatically, it may be because the machine and the services on the machine are just starting. Give it a few minutes for the services to fully start and then refresh the page.
Configure the Very First Tenant
The default admin will also be the very first tenant user of the CentreStack. As a tenant, you will be able to use the system as other tenants just like your customers would. Thus, you can get familiar with the system quickly.
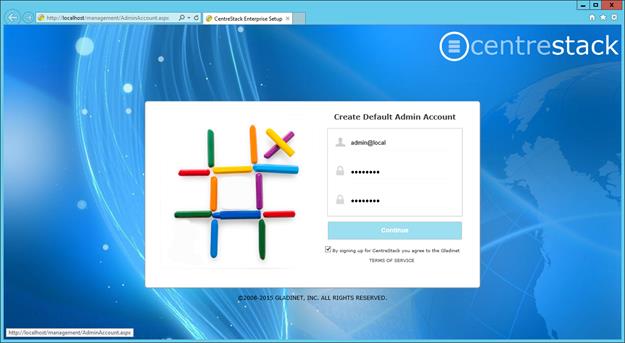
For the default admin account, we recommend using an email address not used in the Active Directory. It can be a real email address or a non-real one (such as admin@local). If it is a non-real email address, the ‘forgot password’ feature will not work if the master admin forgets password.
Select Active Directory (optional)
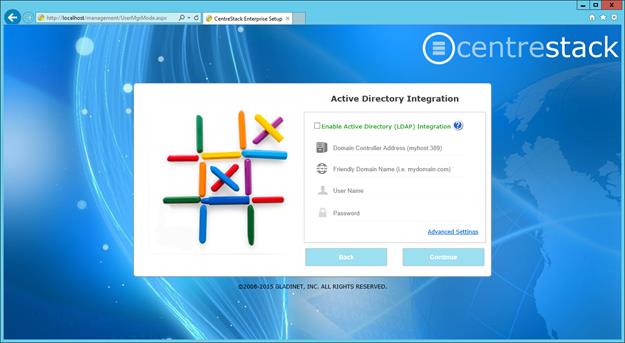
If you had selected the Enterprise package option, the second step will be to set up Active Directory. This is an optional step. If you don’t setup Active Directory now, you can always set it up later at Management Console-> Advanced->Active Directory.
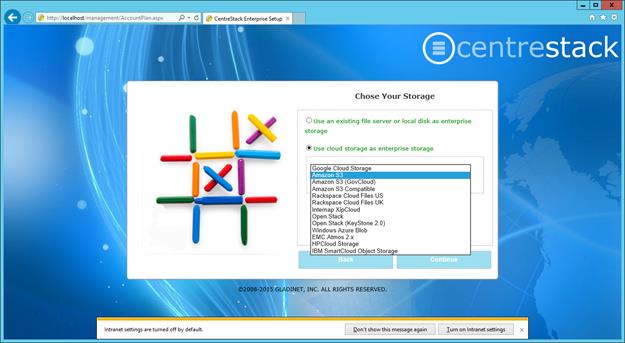
Pick a default (Primary) storage
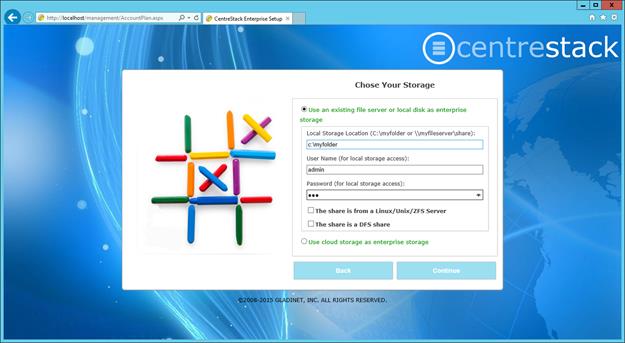
For default storage, you can choose local storage, storage on your file server or cloud storage. This will be the default storage for you as a tenant user.
The local storage can be local to the C: Drive or D: Drive or on the local area network such as a network share from a file server.
The cloud storage can be from local cloud storage such as OpenStack Swift or from public cloud storage, such as Amazon S3.
For example, if you choose Amazon S3 as your cloud storage, the next step is to configure Amazon S3 related parameters like the ‘Access Key ID’ and ‘Secret Access Key’.
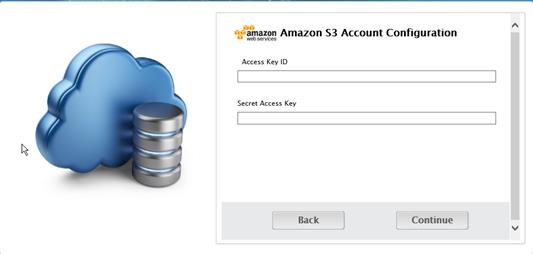
And more Amazon S3 related parameters such as the Amazon S3 Access Key, Secret Key and bucket. Each storage service may have its own related configuration parameters and you will see different user interface for storage configuration.
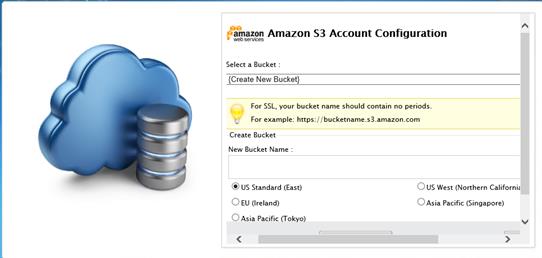
Select an existing Amazon S3 bucket or create a new bucket above. Also, specify the region where the bucket should be created and click Finish.
It may take a few minutes to set everything up, sit back and wait for it to be done …
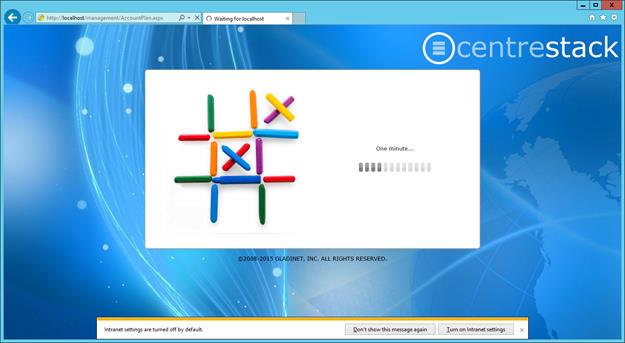
There will also be a set of tutorial pages.
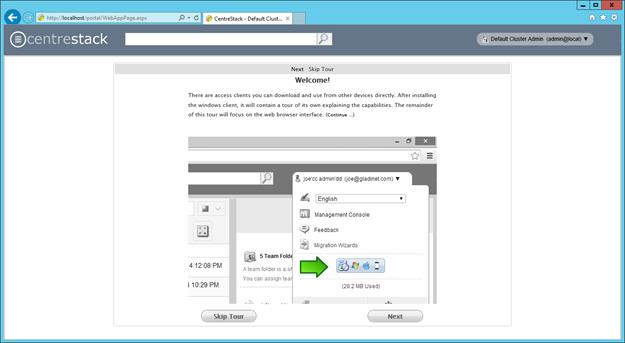
Once it is done, you will be at the Cluster Manager page if you selected the service provider package option. The system is fully functional for 90 days for 20 users to evaluate the product without entering payment information.
If you selected the enterprise package option, you will be at the web based file manager view. You can go to the management console and then go to the cluster manager if you want to go to the same cluster manager page.
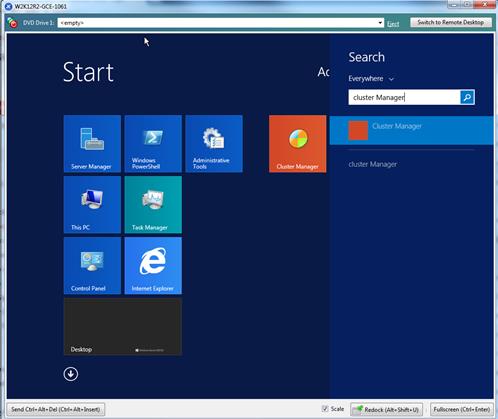
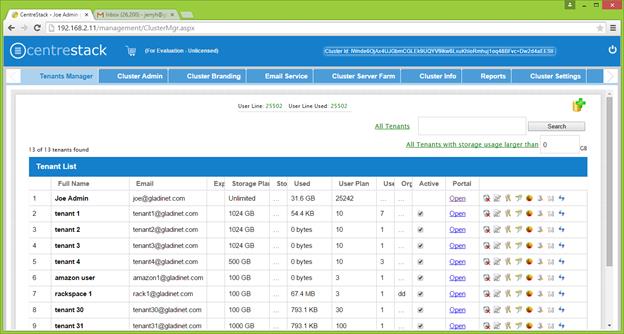
Cluster Manager
For the service provider package, the default page inside the cluster manager is the tenant management page.
For the enterprise package option, the tenant manager page will not be there because it is single tenant. The default page in cluster manager will be at the cluster admin page.

Add Tenant
You can add
a tenant by clicking the Add Tenant Button (![]() ).
).
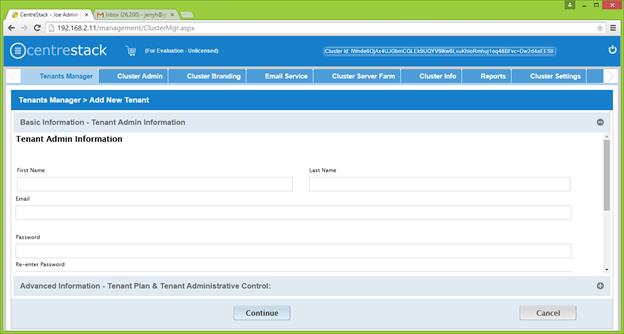
Once the tenant is added, you will see the tenant in the tenant list.

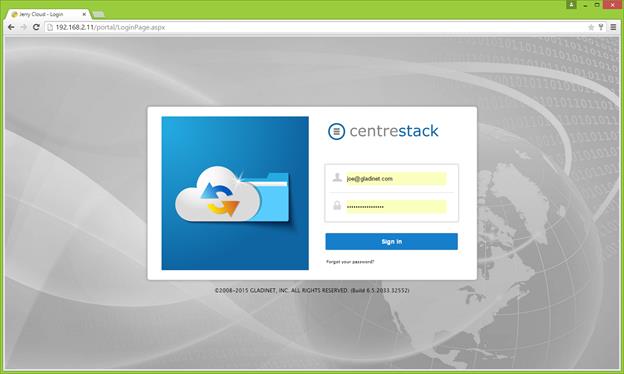
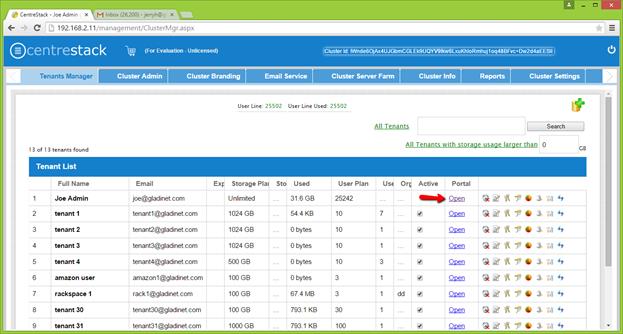
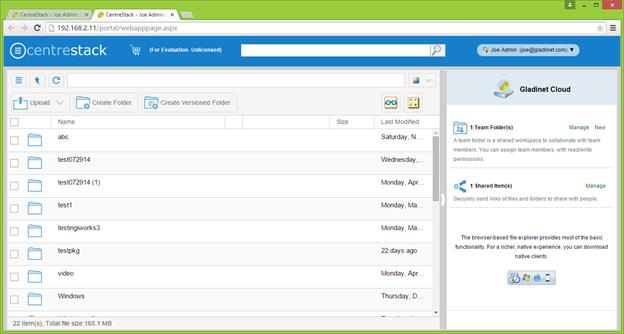
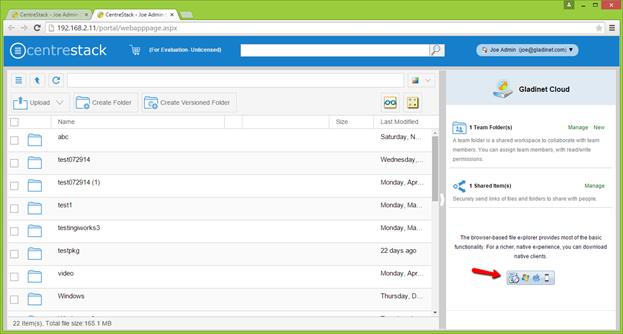
Overview of the Web Portal
Most of the management tasks related to a single tenant are done in the web browser inside the web portal. In order to get into the portal view, click on ‘Open’ in the ‘Portal’ column. (If you are not the master admin, your web portal login will take you directly to the file and folder view of the web portal.)
The default portal view is the web browser based file manager.
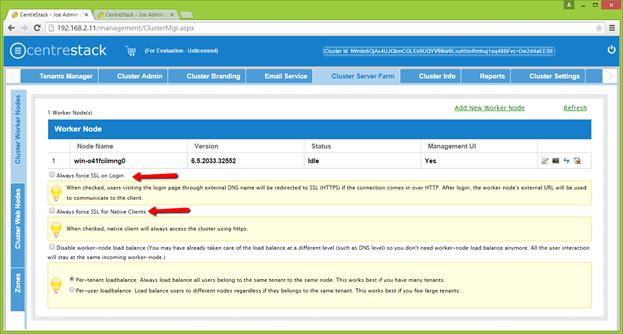
Enable SSL for HTTPS
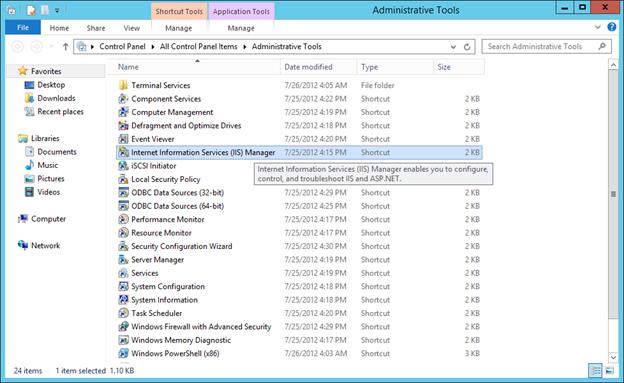
We recommend that you turn on SSL for HTTPS before you download any access clients, because access clients need to connect to your CentreStack’s access end point. Even though it can connect to CentreStack via plain HTTP, we recommend configuring SSL for HTTPS before the client connects. You can get a SSL certificate from a commercial SSL vendor, and apply the SSL certificate from within the IIS Manager. Enabling SSL for IIS Manager is a very standard IIS procedure. After you import the SSL certificate to the CentreStack machine, you can go to the Administrative Tools-> Internet Information Services (IIS) Manager.
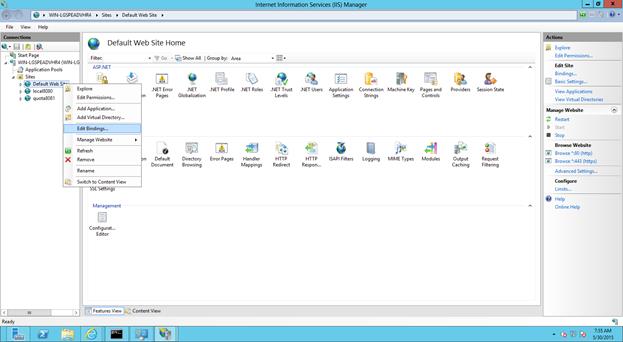
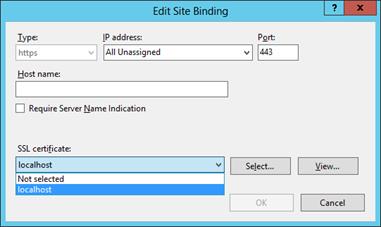
Once you are in the IIS Manager, navigate to the Default Web Site and click on the “Edit Binding …”
Highlight the https – 443 entry and click Edit.
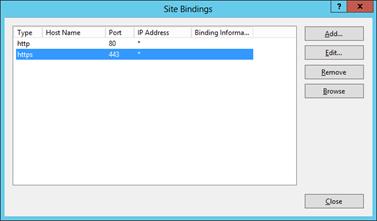
Select the SSL certificate you have and click “OK”
NOTE: Only the web browser portal can accept a self-signed SSL certificate after you give the permission to proceed regardless of the SSL warning. All other native access clients (Windows, Mac, Mobile clients) will all reject the HTTPS connection if the SSL certificate is not valid certificate from a certificate authority.
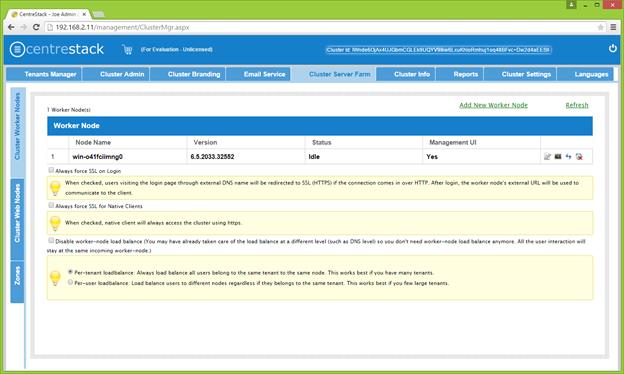
Once the server certificate has been installed on the CentreStack server and bindings applied, go to the Cluster Server Farm -> Cluster Worker Nodes and make sure the External URL matches the HTTPS format.
At the External URL textbox, enter the public DNS name for the node.
Notes:
(a) You can bind the SSL certificate to the Default Web Site so the Default Web Site will have HTTPS binding.
(b) Do not turn on “SSL Only” nor “Require Client Certificate”, because the web service depends on localhost:80 for inter-process communications over localhost:80
(c) If you need “SSL Only” feature, we recommend you un-bind port 80 from the external IP Address on the “Default Web Site”. You can leave localhost: 80 binding intact.
Firewall Settings
CENTRESTACK only need port 80 (HTTP) and port 443 (HTTPS). If you unbind port 80 for external IP address on the “Default Web Site”, you can also close port 80 (HTTP) and leave 443 (HTTPS) as the only open port.
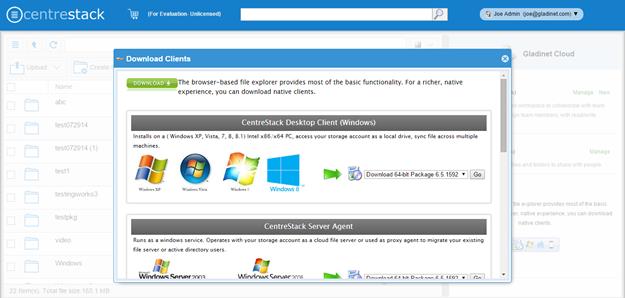
Download the Access Clients
You can
download and install desktop, server clients from the download button in the in
right pane. (![]() ). For mobile clients, depending on the
configuration, you may need to download it from Apple AppStore, Google Play
Store or from the enterprise’s own Mobile Device Management portal.
). For mobile clients, depending on the
configuration, you may need to download it from Apple AppStore, Google Play
Store or from the enterprise’s own Mobile Device Management portal.
Web Based Management Console
You can enter the web based management console by clicking selecting ‘Management Console’ under user’s name in the top right.

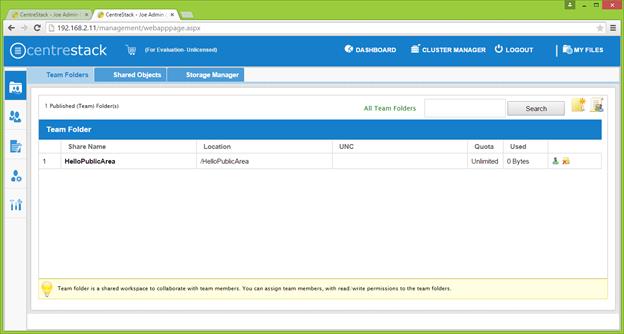
Team Folders
Team Folders are created by the tenant admin and the users that can use the team folder are the team users within the tenant. Each team user can be assigned read or write permissions to the team folder. For the team users that are not assigned with a specific team folder, the team folder will not show up for the team user. Team folder users can also be assigned the “Owner” permission. The owner permission allows the “owner” to maintain and manage the team folder permissions.
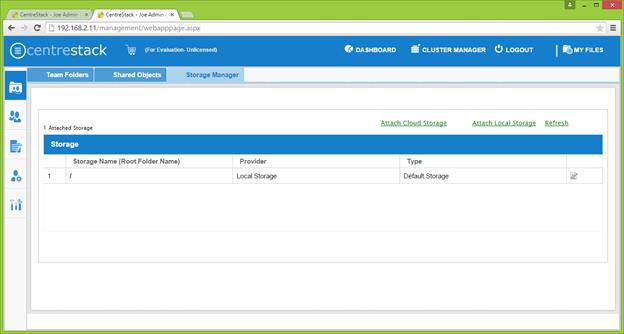
Storage Manager
Tenant admin can update the default (primary) storage configuration information. For example, if the default storage is using Amazon S3, the tenant admin can update the S3 bucket, access key and secret key. However, tenant admin can not switch the default storage into a different storage service.
Tenant admin can also add auxiliary storage by using the “Attach Cloud Storage” or “Attach Local Storage” options. Default storage is the root folder of the tenant. Attached auxiliary storage is top level folders inside the root folder.
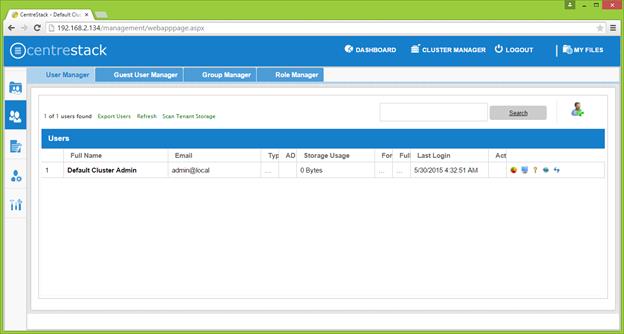
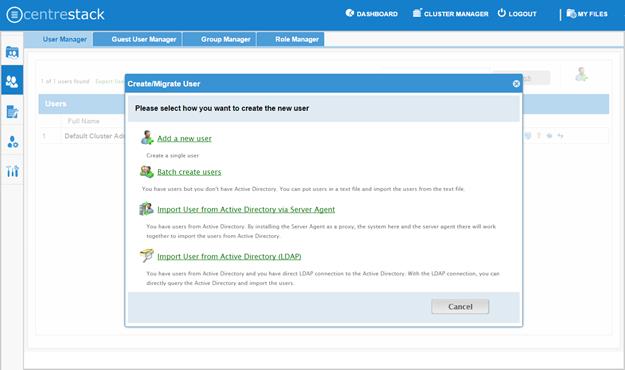
User Manager
In user manager, you can create users, import users from Active Directory over LDAP or import users from Active Directory via Server Agent.
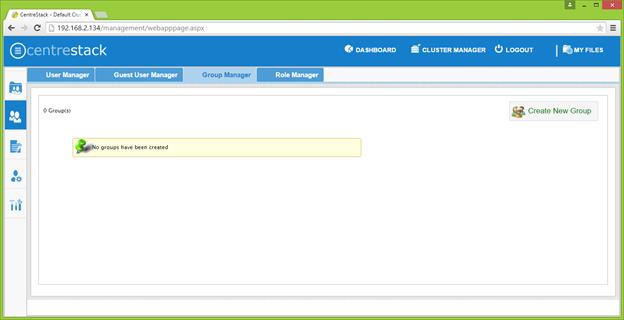
Group Manager
If you are using native Active Directory integration, you will not use the group manager. The Active Directory groups will be available when you assign groups to team folders.
However, if you are not using Active Directory integration, you can create groups and add group of users to a team folder. You cannot have groups inside a group.
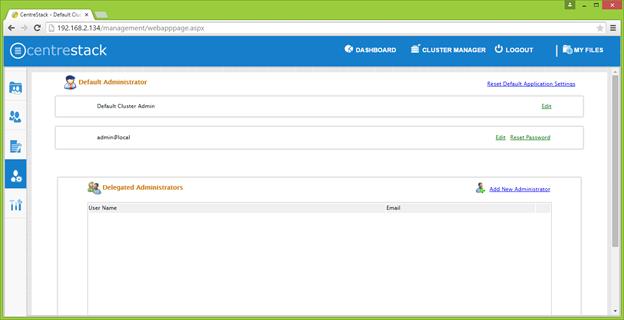
Delegate Administration
You can add full delegated admin to the list of “Cloud Administrators”.
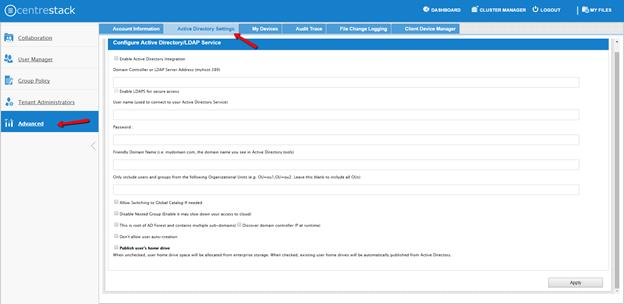
Active Directory Integration (Optional)
It is optional to setup Active Directory Integration. You can get to the integration page from Management Console -> Advanced -> Active Directory Settings
Group Policy
Granular group policies can be configured for the entire tenant users from Management Console -> Group Policy
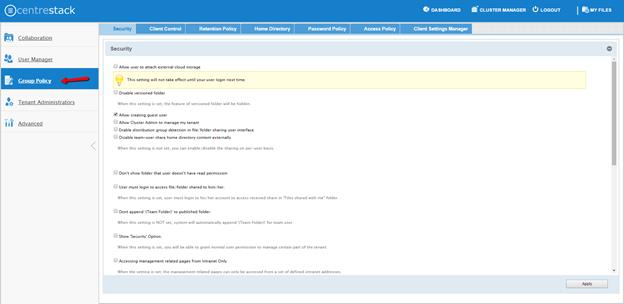
Please visit admin guide for more details.
Advanced Topics
These advanced topics require changes to the web.config file which is critical for the smooth operation of the CentreStack, therefore, it is not recommended that you change the web.config file without first consulting Gladinet support.
Split Database
The database contains two types of information.
The first type of information is relatively static. For example, user name, user email, user’s published shared files and folder etc. This type of information is relatively small. It can be estimated at 5000 bytes per user. So if you have 2000 users, it can be estimated at 10 MB.
The second type of the information is relatively more volatile. For example, the file change log, the audit trace and the file list. It can be estimated at 100 file changes per user per day and each file change can be estimated at 1000 bytes for database storage. So for a 15 day (Default change log history), it can be estimated at 100*1000*15 = 1.5M per user for 15 day period. If you need HIPPA compliance, the default change log history can be significantly longer so this part of the database will be much bigger.
For performance and regulatory reasons, it is recommended to split the database into two separate databases, one that contains static information and one that contains relatively more volatile information.
The secondary database (for more volatile data) can be either a MySQL Database or a SQL Database.
To split the database first identify the root web.config file which is typically located at c:\program files (x86)\CentreStack\root folder (or the root folder under the installation directory) and add following connection strings:
MySQL Database
<connectionStrings>
<add name="MySqlLoggingConnectionString" connectionString="Server=localhost;Database=gladinet;Uid=root;Pwd=password;" />
</connectionStrings>
SQL Database
<add name="LoggingConnectionString"
connectionString="Data Source=server_name;Initial Catalog=logging_db_name;User Id=user_id;Password=user_password;"
providerName="System.Data.SqlClient"
/>
If you already have the connectionStrings section, you can just add the connection string to it. If connectionStrings are not present, you can create the whole section under the root <configuration>.
Change Authentication Algorithm to Version 2
If you have a new installation of CentreStack without any legacy user, we recommend you hard code the authentication algorithm to version 2.
You can locate the web.config file in the root folder of the installation directory (same web.config file as referenced in the previous section) and add a line inside the <appSettings file="branding.config"> section.
<add key="sys_access_ver" value="2" />
Change the Synchronized Uploader to Asynchronized Uploader
Under the C:\Program Files (x86)\CentreStack\ (or the installation directory), look into the UploadDownloadProxy and identify the web.config file. Find the line with the SyncedStorageProxiedPutUploadHandler and change it to StorageProxiedPutUploadHandler.
This optimization might not work on all systems, therefore, it is recommend you test web portal Drag and Drop upload after you make the change. If it does not work for your IIS, you can revert the change back or consult Gladinet support.
<add name="storageuploadex" path="proxiedupload.up" verb="PUT" type="GladinetStorage.SyncedStorageProxiedPutUploadHandler" resourceType="Unspecified" preCondition="integratedMode" />
Zone Support
If you have two independent CentreStack clusters, for example, one cluster in US and one cluster in UK, you can use the zone support to connect the two clusters together. The advantage of using zones is the end user login request will be automatically directed to the zone the user belongs to.
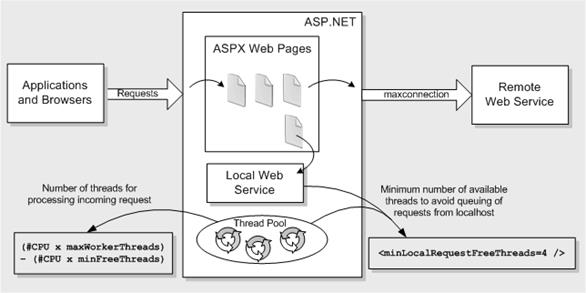
Scalability Tuning
CentreStack is built on top of ASP.NET and WCF. By default, both ASP.NET and WCF has throttle control parameters that we can tune and remove. Please reference this MSDN article for performance tuning:
http://msdn.microsoft.com/en-us/library/ff647813.aspx

(image source: http://msdn.microsoft.com/en-us/library/ff647813.aspx)
(image source: http://msdn.microsoft.com/en-us/library/ff647813.aspx)
Tuning #1 – namespace/web.config
There are three parameters about max concurrent calls, concurrent sessions and concurrent instances.
<serviceThrottling
maxConcurrentCalls="100"
maxConcurrentSessions="100"
maxConcurrentInstances="1000" />
This is set in the <CENTRESTACKInstallDir>/namespace/web.config file
<serviceBehaviors>
<behavior name="WcfWebService.Service1Behavior">
<serviceThrottling
maxConcurrentCalls="100"
maxConcurrentSessions="100"
maxConcurrentInstances="1000" />
</behavior>
</serviceBehaviors>
Tuning #2 – aspnet.config
The aspnet.config is under c:\windows\Microsoft.NET\Framework64\v4.0.30319
<system.web>
<applicationPool
maxConcurrentRequestsPerCPU="5000"
requestQueueLimit="20000"/>
</system.web>
Tuning #3 – machine.config
Machine.config is at %windir%\Microsoft.NET\Framework64\[version]\config\machine.config
(%windir% typically is c:\windows. [version] is 4.0.30319)
processModel
<processModel
autoConfig="false"
maxWorkerThreads="500"
maxIoThreads="500"
minWorkerThreads=”2”/>
connectionManagement
<system.net>
<connectionManagement>
<add address="*" maxconnection="20000"/>
</connectionManagement>
</system.net>
Tuning #4 – appConcurrentRequestLimit
appcmd.exe set config /section:serverRuntime /appConcurrentRequestLimit:50000
Need More Information?
Contact Gladinet Support (support@gladinet.com) for more information